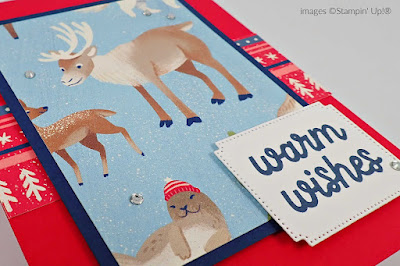
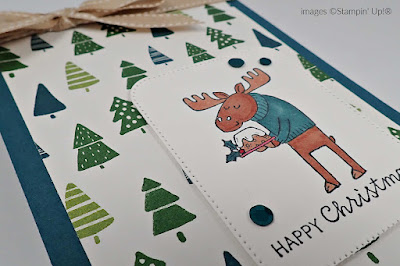
- You can make a stack of 12 with one sheet of DSP (for the focal point) and no two will be exactly alike. (You will need a 2nd sheet for the strip in the background.)
- The sentiment is easily changeable to make this a card for any occasion! Birthday Car, yes. Christmas Card, sure. Kid's Card, no problem. Masculine Card, it works. Friendly Hello, absolutely!
Friday, November 24, 2023
Stampin' Up! Beary Cute ~ Quick & Easy Handmade Card!
Warm Wishes to YOU! I hope you are staying warm and cozy this season. Our weather, as usual, is all over the place. Weirdly enough, even when it's pretty cool, I'm pretty warm these days!
This fun card takes only minutes to make. The Beary Christmas Designer Series Paper takes central stage on this one, so the only stamping needed is just a sentiment. Two things I love about this card ~
This card is the third in my Beary Cute Class to Go, which is available until November 28th. Click HERE if you would like more information about how you can get my current Class to Go FREE.
Thank you for visiting my blog today.
Happy Stamping!
SUPPLY LIST
This list is clickable for your convenience.
Wednesday, November 22, 2023
Stampin' Up! Beary Cute ~ warm wishes
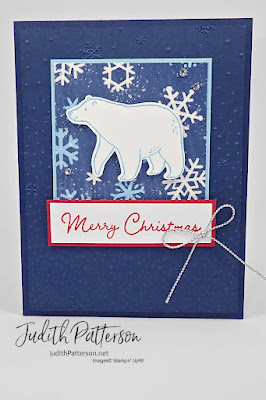
For this second card in my Beary Cute Class to Go, I decided to keep things pretty simple. Once again, the Snowflake Sky 3D Embossing Folder makes the perfect background, this time on Basic White Cardstock.
I love cards that can be given to anyone at any time for any reason and feel that this one definitely is one of those! You can always add a 'happy birthday', 'thinking of you', 'congratulations' or 'Merry Christmas' stamp with your note on the inside of the card.
Happy Stamping!
SUPPLY LIST
This list is clickable for your convenience.
Monday, November 20, 2023
Stampin' Up! Beary Cute ~ Handmade Christmas Card
Yay, yay, yay! I made a Christmas Card today! I am woefully behind on making Christmas cards this year and get so excited every time I get another made. I love how easy and cute this one is! Which means two things.
Thing 1 ~ I'm more than likely going to be making a few more of this one. As I said, I'm running behind on making Christmas Cards this year and this one is pretty fast to stamp, cut and assemble. Plus, that cuteness factor!
Thing 2 ~ This card is perfect for the first card in my new Beary Cute Class to Go! This class will only be available until November 28th. Get those details HERE.
Thank you for visiting my blog today.
Happy Stamping!
SUPPLY LIST
These links are clickable for your convenience.
Saturday, November 18, 2023
Stampin' Up! Sweet & Precious ~ Stamping Inkspirations Blog Hop
Hello and welcome to my blog! I'm excited to be joining the Stamping Inkspirations Blog Hop today. I love being a part of these fun Blog Hops with other stampers sharing what we love and create! Links to all the other blog posts for this hop are near the end of this post! - be sure to check them out! Hopefully you will be as inspired as I always am seeing what everyone else creates for this month's challenge.
This month's challenge was to create a card using the colors in the photo below. There were SO MANY great options for this card. I can't wait to see what the rest of the stampers in this hop decided to use. For me, I decided that a few of these colors were absolutely perfect for a quick card featuring Sweet & Precious stamps by Stampin' Up!
The colors in this challenge are: Crushed Curry, Early Espresso, Granny Apple Green, Crumb Cake and Azure Afternoon. I used all of them except Crushed Curry (but I was very tempted to add a sunflower to the inside of the card to get that in. lol)
To begin, I stamped the sloth image with Tuxedo Black Memento Ink and colored it with Stampin' Blends. Then, I used the 2nd largest square from Stylish Shapes Dies to cut it out. While I had my Stampin' Cut & Emboss Machine out, I embossed a panel of Early Espresso Cardstock with the Timber 3D Embossing Folder.
The Granny Apple Green Cardstock was cut slightly larger than the embossed panel to brighten up the card a little. To adhere the ribbon to the card, place Tear & Tape along all the edges of the ribbon, then adhere to the card. The sentiment, stamped in Granny Apple Green, and the sloth square were attached with Stampin' Dimensionals.
Thank you for visiting my blog today. I hope you are leaving inspired! Click the image below to hop along to the next blog for more inspiration.
Happy Stamping!
Stamping Supplies
Here's a clickable list of the supplies used on this card.
Stampin' Up! Autumn Leaves ~ Sketch Saturday
Hello and welcome to my blog! This card was created for Sketch Saturday's Challenge #739. Today is the first day of this challenge, you have two weeks to play along.
Instead of using circles, I decided these fall leaves from Stampin' Up!'s Autumn Leaves Bundle would be fun on this card. After cutting out the leaves, I decided to use a Blending Brush to add Old Olive ink to a strip of Vellum Cardstock to place behind them. To add a bit of contrast, I used the Distressed Tile Embossing Folder to emboss a panel of Pebbled Path Cardstock, which I then popped up on the matching card base with Stampin' Dimensionals.
Did you know that the Autumn Leaves Dies includes a few frames for the sentiments!? Somehow, I did not realize that until I was making this card. I'm loving these frames and plan to use them on many cards in the future! After adding a copper bow and a few Speckled Dots, this card is ready to go.
Thank you for visiting my blog today. Be sure to visit the Sketch Saturday Blog as well, for more inspiration. We would love it if you would play along and share your creation with us.
Happy Stamping!
SUPPLY LIST
This list is clickable for your convenience.
Stampin' Up! Earthen Elegance ~ Casually Crafting Blog Hop
Hey there! Thanks for stopping by! Today I'm taking part in a blog hop with the Casually Crafting Design Team! We are an international group of Independent Stampin' Up! Demonstrators who want to share our take on casual crafting. We will share what we love with you monthly. Be sure to check out the rests of the design team's projects using the links at the bottom of this post.
For our challenge this month we were to make a card using Soft Sea Foam, Balmy Blue & Smoky Slate. My first thought when seeing the colors and the photo was that this challenge would be perfect for soft Christmas Card. However, something happened while I was perusing my stamp shelves for a stamp set, and I ended up grabbing one I didn't expect.
I haven't used Earthen Textures much yet, but I am looking forward to when I do get a chance to focus on it! For now, I really enjoyed making this card with these softer colors and this earthy stamp set.
I stamped the vase first, with Smoky Slate ink. Then, I placed a sticky note over it before stamping the leafy fronds using Soft Sea Foam ink. The sticky note prevented the bottom of the stems from being stamped on the vase so that it looks like they are naturally coming out of the vase.
After stamping the sentiment with Balmy Blue ink, I used my Double Oval Punch to punch it out. Then, I used my blending brush to blend a little of Balmy Blue onto the card, on the area where the sentiment would go. I then attached the sentiment with Stampin' Dimensionals and added a few 2023-2025 In Color Dots.
Thank you for visiting my blog today. Please be sure to visit the other blogs in this hop, which are listed below.
Happy Stamping!
BLOG HOP
SUPPLY LIST
This list is clickable for your convenience.
Friday, November 17, 2023
Stampin' Up! Perched in a Tree ~ Special Size Die
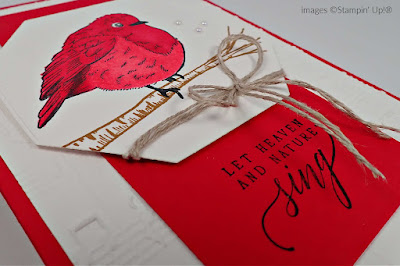
Do you ever have a die that you wish was a little smaller? Did you know it's possible to adjust the size of your cut cardstock when using dies?
I used the largest Countryside Corners Die to cut the cardstock the bird is stamped on. Once I figured out what size I wanted it, I marked my die with a couple of pieces of Post-it® tape.
Watch my 2 minute video tutorial for this technique on YouTube HERE.
Thank you for visiting my blog today.
Happy Stamping!
SUPPLY LIST
This list is clickable for your convenience.
Wednesday, November 15, 2023
Stampin' Up! Perched in a Tree ~ Handmade Christmas Card
This sweet Christmas Card is one I made while Mystery Stamping with my team earlier this year. We love Mystery Stamping together on Zoom or at in person meetings. I love all the different ways everyone puts together their cards. The fact that we all use whatever stamps and paper we are into at the moment makes it even more fun. No two cards are ever alike!

To give the bird a softer look, I stamped it with Pecan Pie ink, then colored with Balmy Blue Stampin' Blends. I also used the Dark Balmy Blue Stampin' Blend to color the Glittered Organdy Ribbon before adding it to my card. (Coloring ribbon with Stampin' Blends can fray the end of your blend a bit, you can decide if it's worth it)
Thank you for visiting my blog today. Reach out if you have any questions about this card, Stampin' Up! or stamping, in general.
Happy Stamping!
SUPPLY LIST
This list is clickable for your convenience.
Monday, November 13, 2023
Stampin' Up! Perched in a Tree ~ Handmade Card
One of my favorite things when creating cards is to make cards that are deceptively simple. This one, turns out, is not that kind of card. It isn't OVERLY complicated either, but there is a little special something about this one that might not be immediately obvious in the photo.

The background behind the trees was created by brushing Pecan Pie, Copper Clay and Early Espresso with Blending Brushes on a piece of Basic White Cardstock. Then, I blended Night of Navy over all of it. The best part was at the end, when I mixed a bit of Rubbing Alcohol and a squirt of Silver Metallic Enamel Effects in a Spritzer and lightly sprayed over the entire piece of cardstock. I love the slightly shimmery effect this gave the background. I feel like it made the background look like a forest at night.
Thanks for visiting my blog today.
Happy Stamping!
SUPPLY LIST
This list is clickable for your convenience.
Saturday, November 11, 2023
Stampin' Up! Perched in a Tree ~ here for you
This fall card was inspired by a card in the 2022 July-December Mini Catalog (p. 46). The card in the catalog had a very winter feel, so I decided to recreate with fall colors.
The background, behind the trees, was created by dotting Balmy Blue, Pecan Pie, Pumpkin Pie and Lemon-Lime Twist with Sponge Daubers randomly on piece of Basic White Cardstock. Then, extra color was added to the leaves, again with Sponge Daubers.
Here's a tip for the big die from Aspen Tree Dies, emboss the cardstock with the Timber 3D Embossing Folder before using the die to cut out your shape.
Thanks for looking at my blog today. Watch the tutorial for this card (and more) on my YouTube Channel.
Happy Stamping!
SUPPLY LIST
This list is clickable for your convenience.
Thursday, November 9, 2023
Stampin' Up! Perched in a Tree ~ Red & White
I love the clean and fresh look of this bright white card with pops of red. While this card does have several parts and pieces, it is really simple to make.
Stamping the sentiments and images in Stampin' Up!'s beautiful colors on their crisp white cardstock means you don't HAVE to color the images. This is perfect for creating quick cards!
With plenty of added texture from Stylish Shapes Dies, Merry Melody 3D Embossing Folder, the Double Oval Punch and Iridescent Pearls, the plenty going on to keep this card interesting.
Thanks for visiting my blog today!
SUPPLY LIST
This list is clickable for your convenience.
Wednesday, November 8, 2023
Stampin' Up! Perched in a Tree ~ joy & peace
Perched in a Tree is a sweet stamp set where the main image is a bird. The entire set is very peaceful with easy to read, thoughtful sentiments appropriate for Christmas and beyond.
One Horse Open Sleigh Designer Series Paper, which is only available online while supplies last, is full of peaceful winter scenes, making it ideal for using with this stamp set.
Thank you visiting my blog today. Come back soon.
Happy Stamping!
SUPPLY LIST
This list is clickable for your convenience.
Saturday, November 4, 2023
Stampin' Up! Festive & Fun ~ Sketch Saturday
Hello and welcome to my blog! This card was created for Sketch Saturday's Challenge #738. Today is the first day of this challenge, you have two weeks to play along. There's an optional Theme Challenge, which is not to use any black or white!
I thought about trying for that added challenge of not using any black or white, but was in the mood for a bright card with lots of color.
I'm so literal when I look at things that most often my cards look exactly like the sketches they were based on. Thank goodness for great sketches! I love that this card can be made in SO many different ways, just by changing colors, stamps papers. Sketches like this one help me create when I'm in a rut!
Thanks for visiting my blog today. Be sure to link your card over on Sketch Saturday when you play along with us.
Happy Stamping!
SUPPLY LIST
clickable for your convenience
Friday, November 3, 2023
Stampin' Up! Festive and Fun ~ Happy Christmas Moose
Oh my goodness. I love this Christmas Moose! Isn't he fun!? This quick and easy Christmas card is fun to color and assemble.
Instead of centering the background paper on the card base like I usually do, I decided to cut it a little longer this time and lined it up with the bottom of the card front. Then, I also placed the moose focal point piece off centered.
Thank you for visiting my blog today. I hope you are inspired to take this card and make it your own by changing the stamps, colors and or paper.
Happy Stamping!
SUPPLY LIST
This list is clickable for your convenience.
Wednesday, November 1, 2023
Stampin' Up! Festive & Fun ~ Merry Christmas
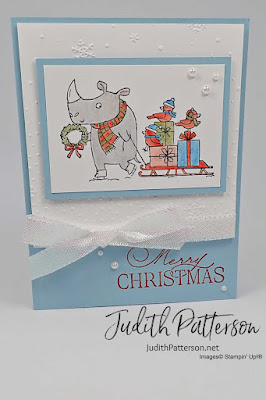
I had so much fun coloring this happy rhino and friends on the card I posted Monday that I decided to color this image again, this time with watercolor pencils! Of course, after coloring I went over almost everything lightly with a Blender Pen. Also, it's hard to see in the photo, but I added a touch of Wink of Stella to the rhino's skates, just for a touch of added sparkle!
This Snowflake Sky 3D Embossing Folder I used on the background is one of my favorites this winter, ESPECIALLY when combined with Iridescent Pearls and the Iridescent Ribbon is a fun bonus!
This is a classic card layout that is easy to adapt for new cards year after year.
Thank you for visiting my blog today.
Happy Stamping!
SUPPLY LIST
This list is clickable for your convenience. .
Subscribe to:
Posts (Atom)


