Thank you for joining us for our Stampin' Up!® Demonstrator Training Program Monthly Blog Hop! We are so happy that you could join us today for this blog hop for ideas and creative inspiration. We are a group of Stampin' Up!® Demonstrators from around the world that are taking part in training that is helping us to build a successful Stampin' Up!® business and reach some goals we have set. We really appreciate your support.
You may be starting here or have come from another blog - either way you can find the link list at the bottom of this post so that you can see every blog post and idea today.
As part of our training, Kylie & Bruno challenge us each month to create thank you cards for our customers and team members. This is one of my favorite things about their training. Partly because I think it is incredibly important to say thank you, especially to our customers & team members. But also because I love being inspired by all the other creative demonstrators in this blog hop!
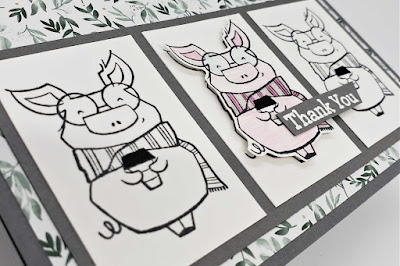
The card I am sending this month as my 'thank you' features Stampin' Up!'s Joyful Life stamps. This set is too cute and so easy to create with! It works with a huge variety of simple sketches, which is what I love. Plus, it's fun to color the various images.
MEASUREMENTS
Card Base ~ Basic Gray Cardstock ~ 8-1/2" x 5-1/2", score at 4-1/4"
Layer 1 ~ Ever Eden Specialty Designer Series Paper ~ 4" x 5-1/4"
Layer 2 ~ Basic Gray Cardstock ~ 5" x 2-1/2"
Layer 3 ~ Basic White Cardstock ~ 1-1/2" x 2-1/4" (*3)
Scrap of Basic White for the 4th piggy
Scrap of Basic Gray for the sentiment
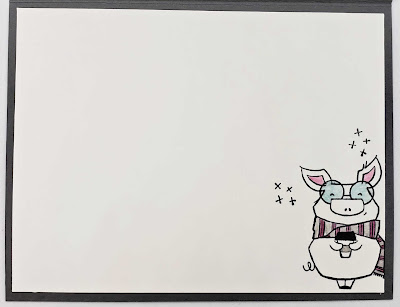
Inside Layer ~ Basic White Cardstock ~ 4" x 5-1/4"
- Stamp the piggy on each Layer 3 piece and the Basic White scrap, using Tuxedo Black Memento ink
- Use Watercolor Pencils to color the piggy on the scrap. I used Melon Mambo, Rich Razzleberry, Basic Gray and Bermuda Bay. Then, I went over the lids on all four coffee cups with the Basic Black.
- Go over the piggy with a Blender Pen. Remember to clean the tip before switching colors.
- Fussy cut around the 4th piggy with Paper Snips, or other small scissors
- Attach Layers 1-3 to the front of your card base with your favorite adhesive, mine is Liquid Glue
- Use Mini Stampin' Dimensionals to attach the colorful piggy over the center piggy, as shown
- Stamp the sentiment on the Basic Gray scrap with Versamark and heat emboss with White Embossing Powder
- Trim around the sentiment and angle the right side a bit
- Use Liquid Glue and a Mini Stampin' Dimensional to attach the sentiment to the front of the card as shown.
On the inside layer, I decided to add another piggy, only coloring part of this one. I also added the little crosshatch? stamp a couple of times. Use your favorite adhesive to attach this layer to the inside of your card.
I hope you enjoy this card! Don't forget to check out all the other cards from the amazing demonstrators in this blog hop.
If you would like to see the product list for this one, it is at the end of this post.
Also, the elegant Ever Eden Specialty Designer Series I used for this card is only available until January 3rd, or while supplies last. You don't want to miss it! :)
Happy Stamping!
Blog Hop List
Stampin' Up! has an amazing promotion this month! In the USA, you can join Stampin' Up! for only $75! What do you get for $75 +tax? I'm so glad you asked. You can choose up to $125 worth of Stampin' Up Merchandise as your kit contents. That's right, YOU choose your kit! Plus, you will get a Paper Pumpkin Kit (not the current one) and FREE shipping!
Learn more here. Contact me if you have any questions, I would love to help you build your kit!
PRODUCT LIST
Please use Host Code VNCZG7VK when placing orders under $150 during the month of November 2021.


Thanks for sharing that very cute card.
ReplyDeleteMy pleasure! :)
DeleteSuch fun cards, Judith! Thank you for sharing.
ReplyDeleteThank you Mary Ann!
DeleteVery cute card.
ReplyDeleteAdorable cards Judith x
ReplyDeleteCute card's. Thanks for sharing
ReplyDeleteOohh so great Judith - I love this set! What an awesome idea to have three together - love it
ReplyDeleteAnd with that paper - terrific combo - love the whimsy 🙂
So cute! Love the extra little piggy inside too! Thank you Judith for taking part in our Demonstrator Training Blog Hop this month.
ReplyDeleteAdorable! Love that pig and how you repeated it 3 times.
ReplyDelete