Wednesday, September 29, 2021

Stampin' Up! Pretty Pillow Box Dies


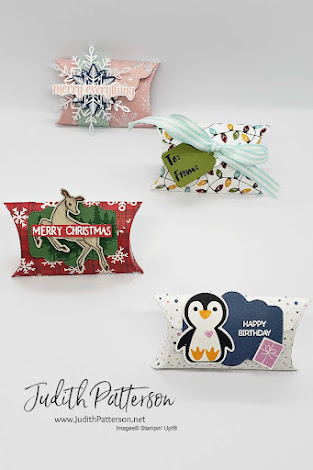
Hello & Welcome!  I have been playing around with Stampin' Up!'s Pretty Pillow Box Dies and love them!  So far, I have only been creating pillow boxes with Designer Series Papers, which makes beautiful boxes on the inside as well as out!  It also makes creating boxes fast and easy.  I will quickly run through how to make each of these boxes here.  You can also scroll to the bottom of this post for a link to my YouTube video where I demonstrate how to make a simple pillow box!


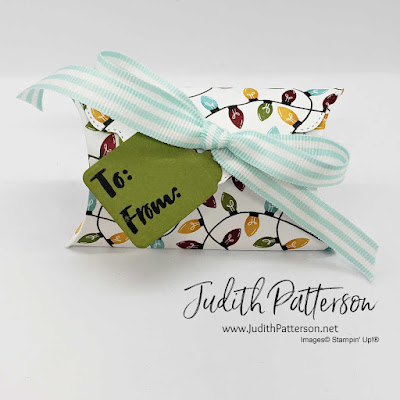
This first one is the one I demonstrate in my YouTube video.  It really was quick to make. After I die cut the box and assembled it, I stamped the 'To & From' on a scrap of Old Olive Cardstock and die cut it (with another die from the Pretty Pillow Box Dies).  
I finished by tying it closed this pretty Pool Party Striped  Ribbon. 


For this one, I stamped the trees from the Peaceful Deer stamps on a scrap of Garden Green Cardstock, with Garden Green ink.  I did overlap some of the trees.  Then, I stamped the deer on Soft Suede Cardstock with Early Espresso ink.  I used Blender Pens with Flirty Flamingo & Early Espresso inks to color the deer.  I heat embossed 'Merry Christmas'.  Once everything was stamped, I used Pretty Pillow Box Dies to cut out the box and tree piece.  I used the Deer Builder Punch to punch out the deer.  'Merry Christmas' was just trimmed around with Paper Snips.  I used Liquid Glue to assemble the box, to attach the Garden Green Tree piece to the front of the box and to attach 'Merry Christmas' to the deer.  I used Stampin' Dimensionals to attach the deer to the box flap and to attach the flap closed. 


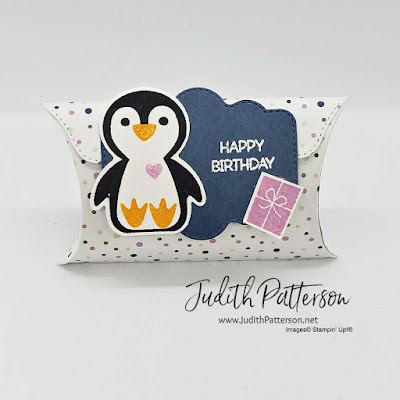
This is another one that was pretty quick!  I stamped the penguin and punched him out.  Then, I stamped the gift and fussy cut around it.  After heat embossing 'happy birthday', I used the Pretty Pillow Box Dies to cut out the Misty Moonlight piece and the pillow box.  I used Liquid Glue to assemble everything and a Stampin' Dimensional on the flap to seal it closed. 


This one might be my favorite.  I adore this Whimsy & Wonder Specialty Designer Series Paper.  To close this one, I decided to wrap a belly band (measuring 1" x 5-1/4") around it.  The large snowflake is a die cut piece from Wonderful Snowflakes.  I heat embossed the smaller snowflake on Misty Moonlight Cardstock and used Stitched Snowflakes Dies to cut it out.  'Merry Everything' was stamped with Blushing Bride ink, then fussy cut around.  I used Liquid Glue to assemble the box and the band.  Everything else was attached using Glue Dots.   


I hope you enjoyed these boxes!  
Please contact me if you have any questions.  
If you live in the USA and don't have a Demonstrator I would love to send you our catalogs, or, even better, have you Join my team!  
You can also click the link at the top of my blog to sign up for my newsletter.  
Of course, if you just want to shop, you can click any of the product links at the bottom of this post, or SHOP button across the top of my blog, or the host code on the right side of this page.  
I would L♥VE to be your Stampin' Up! Demonstrator!

Click on the picture below to watch my YouTube Video showing you how to make this card.


Happy stamping!


It's time to Sale-a-brate!
Sale-a-bration is one of Stampin' Up!'s biggest promotions of the year. 
During Sale-a-bration, you can earn exclusive products for FREE!
For every $50 you spend, you can add your pick of Sale-a-bration products to your cart at no additional cost.
SALE-A-BRATION ENDS THURSDAY!!


Interested in joining Stampin' Up!  Now is a great time!  When you join during Sale-a-bration, you get to pick a new bundle to add to your Starter Kit FREE!  
PRODUCT LIST 
(Please use the current Host Code, found in the top right corner of my blog, on orders under $150)


 

Monday, September 27, 2021

Stampin' Up! Feels Like Home


Stampin' Up!'s Feels Like Home stamps are perfect for a card to congratulate someone on buying a new home!  I'm so excited that this card is on the way to a special young couple that just moved.   I love to watercolor this image.  This time, I decided to just color part of it for the Spotlight Technique.  Such fun! 

MEASUREMENTS
Bermuda Bay Card Base ~ 8-1/2" x 5-1/2", score at 4-1/4"
Layer 1 ~ Shimmery White Cardstock ~ 4" x 5-1/4"
Layer 2 ~ Bermuda Bay Cardstock ~ at least 1-1/2" x 2-3/4" (this will be cut down)
Layer 3 ~ Fluid 100 Watercolor Paper ~ at least 1-1/2" x 2-3/4" (this will be die cut)
Inside ~ Basic White Cardstock ~ 4" x 5-1/4"

  • Stamp the image on the Shimmery White CS and the Fluid 100 Watercolor paper, using Staz On ink.  (Using the Stamparatus helps to center the image)
  • While the ink pads are closed, give them a firm squeeze.  Then, open them up to use as paint palettes with the Water Color Painters.  Paint the image on the Watercolor paper.
  • Use a Basic Black Stampin' Write Marker to color just the word 'home' on the sentiment stamp.  Stamp in the bottom right corner of the Shimmery White CS.
  • Use your favorite adhesive to adhere the Shimmery White layer to the front of the card base. 
  • Once the watercolor is completely dry, use the Stitched Rectangle Dies to cut out around the door. Don't run the die completely through the machine.  Only go a tad over halfway.  Then, remove the Watercolor Paper and readjust the die to cut the other end.  (This way you can cut a shorter image than the die is.)
  • Trim the Bermuda Bay (Layer 2) to 1/4" bigger than the final die cut piece. 
  • Adhere the Watercolor Layer to the Bermuda Bay Layer.  Then, attach it, centered, on the front of your card. 

Stamp 'Congratulations' using Bermuda Bay ink on the Basic White Cardstock.  Use Staz On to stamp the flower pot in the corner of the Basic White.  Very lightly watercolor the image - don't get it too wet since this isn't watercolor paper.  Adhere the finished Basic White CS to the inside of your card. 


I hope you enjoyed this card!  

Please contact me if you have any questions.  
If you live in the USA and don't have a Demonstrator I would love to send you our catalogs, or have you Join my team!  
You can also click the link at the top of my blog to sign up for my newsletter.  Of course, if you just want to shop, you can click any of the product links at the bottom of this post, or SHOP button across the top of my blog, or the host code on the right side of this page.  
I would L♥VE to be your Stampin' Up! Demonstrator!

Happy stamping!


It's time to Sale-a-brate!
Sale-a-bration is one of Stampin' Up!'s biggest promotions of the year. 
During Sale-a-bration, you can earn exclusive products for FREE!
For every $50 you spend, you can add your pick of Sale-a-bration products to your cart at no additional cost.
The last day to Sale-a-brate is September 30th!


Want it all!?  Now is a great time to join Stampin' Up.  When you join during Sale-a-bration, you get to pick a new bundle to add to your $99 Starter Kit FREE!  
PRODUCT LIST 
(Please use the current Host Code, found in the top right corner of my blog, on orders under $150)


Saturday, September 25, 2021

Stampin' Up! Peaceful Deer Christmas Card - Sketch Saturday


Happy Saturday!  Today's card is once again featuring the Peaceful Prints Designer Series Paper from Sale-a-bration!  Only FIVE days left of Sale-a-bration, so if you want to get your hands on some of this FREE paper, don't wait!

Sketch Saturday's Sketch #679 inspired this card.  I didn't follow the sketch exactly, but that's the great thing about a good sketch!  It gets those creative juices flowing and inspires you to create!  I'm looking forward to seeing what other people create with this sketch.  We would love it if you would play along, too.  Click HERE to go to Sketch Saturday for the rules and to see the other cards.


MEASUREMENTS
Basic Black Card Base ~ 8-1/2" x 5-1/2", score at 4-1/4"
Layer 1 ~ Peaceful Prints DSP ~ 4" x 5-1/4"
Layer 2 ~ Basic Black Cardstock ~ 2-3/4" x 3-3/4"
Layer 3 ~ Peaceful Prints DSP ~ 2-1/2" x 3-1/2"
For the Scalloped Circle ~ Real Read Cardstock ~ at least 1-7/8" x 1-7/8"
 For the Circle ~ Basic White Cardstock ~ at least 1-7/8" x 1-7/8"
Inside ~ Basic White Cardstock ~ 5-1/4" x 4"
and Peaceful Prints DSP ~ 1/2" x 4"

  • Stamp the sentiment on the small Basic White CS using Real Red ink. 
  • Use your favorite adhesive to attach the DSP and Basic Black layers, as shown.
  • Use the Layering Circles Dies to cut out the 2 circles, then glue them together, as shown. 
  • Attach the scalloped circle to the front of the card with Stampin' Dimensionals. 
  • Tie a bow with Gold Trim.  Attach it to the circle with 1/2 of a Glue Dot.  (You can cut the Glue Dots in half with scissors) 

Attach the strip of DSP to the bottom of the Basic White CS.  Then, stamp the sentiments at the top, using the Real Red ink again.  Adhere the Basic White CS to the inside of your card with your favorite adhesive. 


I hope you enjoyed this card!  

Please contact me if you have any questions.  
If you live in the USA and don't have a Demonstrator I would love to send you our catalogs, or have you Join my team!  
You can also click the link at the top of my blog to sign up for my newsletter.  Of course, if you just want to shop, you can click any of the product links at the bottom of this post, or SHOP button across the top of my blog, or the host code on the right side of this page.  
I would L♥VE to be your Stampin' Up! Demonstrator!

Happy stamping!


It's time to Sale-a-brate!
Sale-a-bration is one of Stampin' Up!'s biggest promotions of the year. 
During Sale-a-bration, you can earn exclusive products for FREE!
For every $50 you spend, you can add your pick of Sale-a-bration products to your cart at no additional cost.
The last day to Sale-a-brate is September 30th!


Want it all!?  Now is a great time to join Stampin' Up.  When you join during Sale-a-bration, you get to pick a new bundle to add to your $99 Starter Kit FREE!  
PRODUCT LIST 
(Please use the current Host Code, found in the top right corner of my blog, on orders under $150)


Friday, September 24, 2021

Stampin' Up! Peaceful Deer - Card from the Catalog


Hi!  Where do you find inspiration for your paper crafting projects?  One of my favorite places is Stampin' Up!'s Catalogs.  Each and every catalog is full of beautiful papercrafts that you can recreate!  This card, is an example of that.  It is based on the tag found on p. 9 of the Sale-a-bration brochure.  I simplified it just a bit as I changed the idea from a tag to a card.  The changes were mostly because I am not a huge fan of distressing, and I don't own the Early Espresso Faux Suede Trim used on the tag.  

MEASUREMENTS
Cherry Cobbler 8-1/2" x 5-1/2", score at 4-1/4"
Peaceful Prints Designer Series Paper ~ 3-1/2" x 4-3/4" (*2), 
Plus, 2 deer fussy cut from the DSP
Basic White Cardstock ~ 4" x 5-1/4" (inside)

  • Begin by using a Blending Brush to add a touch of Crumb Cake ink to all of the pieces of DSP, including the deer. 
  • Stamp the large tree 3 times on the front of the DSP, as shown, with Garden Green ink.
  • Then, stamp the sentiment with Tuxedo Black Memento ink.
  • Adhere the DSP layers to the front of the card, as shown. 
  • Attach the deer on the left with your favorite adhesive, and the one on the right with Mini Stampin' Dimensionals. 

Stamp 'Merry Christmas' with the Garden Green ink on the piece of Basic White CS.  Then, use the Blending Brush to add a touch of the Crumb Cake ink to the lower right corner.  Stamp the sweet deer over the hint of color in the corner.  Adhere this to the inside of your card. 


The Peaceful Prints Designer Series Paper used on this card is one of the FREE Sale-a-bration items you can get with a qualifying order.  This beautiful DSP is perfect for the holidays, and winter in general!  Don't miss your chance to get it.  Sale-a-bration ends September 30th. 

I love finding inspiration in Stampin' Up!'s catalogs and hope you do too!  Let me know if there is a certain card you would like to learn to make, and I will do my best to show you how. 

Happy Stamping! 

Click on the picture below to watch my YouTube Video showing you how to make this card.

Happy stamping!


It's time to Sale-a-brate!
Sale-a-bration is one of Stampin' Up!'s biggest promotions of the year. 
During Sale-a-bration, you can earn exclusive products for FREE!
For every $50 you spend, you can add your pick of Sale-a-bration products to your cart at no additional cost.


Interested in joining Stampin' Up!  Now is a great time!  When you join during Sale-a-bration, you get to pick a new bundle to add to your Starter Kit FREE!  
PRODUCT LIST 
(Please use the current Host Code, found in the top right corner of my blog, on orders under $150)


Wednesday, September 22, 2021

Stampin' Up! Sweet Little Stockings Christmas Card

+

Hi!  Thanks for visiting my blog today.  I used Stampin' Up's Sweet Little Stockings Bundle to create today's card, along with the Sweet Stockings Designer Series Paper.  If you love critters, or have people in your life who do, you need this set!  I love the sweet animals, fun stockings and great patterns included in every part of this bundle and the coordinating paper!  The fact that (almost) every image has a coordinating die is a great bonus. :)

MEASUREMENTS
Cherry Cobbler Card Base ~ 8-1/2" x 5-1/2", score at 4-1/4"
Old Olive Cardstock ~ 4-1/8" x 5-3/8", 2" x 3-1/4"
Sweet Stockings Designer Series Paper ~ 4" x 5-1/4", 1/2" x 4"
Basic White Cardstock ~ 4" x 5-1/4" (inside) and scraps

  • Stamp the puppy, stocking, hat and candy cane on the Basic White CS scraps using Tuxedo Black Memento ink.
  • Color the images with Stampin' Blends.
  • Stamp the sentiment in the center of the small piece of Old Olive CS using Versmark ink.  Cover the stamped sentiment with Black Embossing Powder.  Tap off the excess powder.  Then, set with the Heat Tool.
  • Use the smallest die from Scalloped Contours Dies to cut out the sentiment. 
  • Cut out the stamped and colored images with the coordinating dies from Stockings Dies
  • Adhere the DSP layer to the larger Old Olive CS with your favorite adhesive. 
  • Attach each end of the Ribbon behind the Old Olive CS with Glue Dots.  Tie a 'faux bow' around the ribbon.  Secure it to the DSP with another Glue Dot. 
  • Glue the puppy to the top of the stocking with just a tiny amount of glue.  Add another tiny strip of glue to the hat before attaching it to the puppy's head. 
  • Use Stampin' Dimensionals to attach the DSP & Old Olive layers to the Card Base.
  • Attach the sentiment and stocking (with puppy & hat) to the front of the card, as shown. 
  • Use a touch of glue to attach the candy cane to the edge of the sentiment piece. 

Attach the strip of DSP to the bottom of the 4" piece of Basic White CS.  Then, stamp the greeting using Cherry Cobbler ink.  Adhere to the inside of your card with your favorite adhesive. 


I hope you enjoyed this card!  
Please contact me if you have any questions.  
If you live in the USA and don't have a Demonstrator I would love to send you our catalogs, or, even better, have you Join my team!  
You can also click the link at the top of my blog to sign up for my newsletter.  
Of course, if you just want to shop, you can click any of the product links at the bottom of this post, or SHOP button across the top of my blog, or the host code on the right side of this page.  
I would L♥VE to be your Stampin' Up! Demonstrator!

Click on the picture below to watch my YouTube Video showing you how to make this card.


Happy stamping!


It's time to Sale-a-brate!
Sale-a-bration is one of Stampin' Up!'s biggest promotions of the year. 
During Sale-a-bration, you can earn exclusive products for FREE!
For every $50 you spend, you can add your pick of Sale-a-bration products to your cart at no additional cost.


Interested in joining Stampin' Up!  Now is a great time!  When you join during Sale-a-bration, you get to pick a new bundle to add to your Starter Kit FREE!  
PRODUCT LIST 
(Please use the current Host Code, found in the top right corner of my blog, on orders under $150)


Monday, September 20, 2021

Stampin' Up! Gorgeous Leaves Bundle


Hi! Welcome to my blog.  It's Monday, that means two things.  1) We have a whole week of new, fun and beautiful cards ahead of us!  2) Today's card is perfect for that oh so helpful guy in your life!

Stampin' Up!'s Gorgeous Leaves Bundle seems to be my go-to for masculine cards lately.  It's a gorgeous bundle that includes Gorgeous Leaves stamps and Intricate Leaves Dies. (Did you know that when you purchase bundles you are getting 10% off the combined purchase price?)


MEASUREMENTS
Mossy Meadow Card Base ~ 6-1/2" x 6-1/4", score at 3-1/4"
Beauty of the Earth Designer Series Paper ~ 3" x 6"
Cajun Craze Cardstock ~ 3/4" x 5-1/2" (*2)
 Bumblebee Cardstock ~ scraps
Basic White Cardstock ~ 3" x 6" (inside)

  • Stamp the leaves on the Bumblebee scraps using Cajun Craze and Mossy Meadow inks.
  • Use the coordinating leaf dies to cut out the stamped leaves.
  • Mask the bottom line of the sentiment die with a post it note before inking the top portion with Versamark ink.  Remove the post it, then stamp towards the left of one of the Cajun Craze CS strips.  Cover with Black Embossing Powder, tap of the excess, then set with the Heat Tool. 
  • Clean the stamp, stamp off to make sure all the ink is off and it is dry. 😉
  • Repeat the process, this time covering the top portion of the stamp with a post and stamping the bottom part of the sentiment towards the right of the 2nd Cajun Craze CS.
  • Use your favorite adhesive to attach the DSP, then the Cajun Craze strips.  
  • Attach the leaves to each other, as shown, with your favorite adhesive.  Then, use Stampin' Dimensionals to attach them to the front of the card. 

Use Mossy Meadow ink to stamp 'thank you' on the piece of Basic White CS.  Then, stamp the small leaves around it in Cajun Craze ink.  Adhere this piece to the inside of the card with your favorite adhesive.


I hope you enjoyed this card!  

Please contact me if you have any questions.  
If you live in the USA and don't have a Demonstrator I would love to send you our catalogs, or have you Join my team!  
You can also click the link at the top of my blog to sign up for my newsletter.  Of course, if you just want to shop, you can click any of the product links at the bottom of this post, or SHOP button across the top of my blog, or the host code on the right side of this page.  
I would L♥VE to be your Stampin' Up! Demonstrator!

Happy stamping!


It's time to Sale-a-brate!
Sale-a-bration is one of Stampin' Up!'s biggest promotions of the year. 
During Sale-a-bration, you can earn exclusive products for FREE!
For every $50 you spend, you can add your pick of Sale-a-bration products to your cart at no additional cost.


Want it all!?  Now is a great time to join Stampin' Up.  When you join during Sale-a-bration, you get to pick a new bundle to add to your $99 Starter Kit FREE!  
PRODUCT LIST 
(Please use the current Host Code, found in the top right corner of my blog, on orders under $150)