Shop

Wednesday, March 31, 2021

Stampin' Up! Pampered Pets Birthday Card


Happy Wednesday!  How is it possible that we are already halfway through this week!?  Time is flying lately.  I made this fun cat card for a close family friend who just turned 16.  

The first thing I did when making this card was to stamp the sentiment using Frost White Shimmer Paint mixed with a few drops from a Real Red Refill bottle.  After mixing the ink and shimmer paint, I applied it to the stamp using a Sponge Dauber. This is PAINT, so make sure to clean off your stamp quickly after stamping your image.  


While the sentiment was drying, I cut the Playful Pets Designer Series Paper (4" x 5-1/4") for the card front. I also fussy cut the cat from the same package of DSP.  
The Real Red cardstock behind the sentiment was cut to 2-5/8" x 3-1/4".  
Once the sentiment was dry, I trimmed around it using my Paper Trimmer.  
It ended up measuring 2-1/2" x 3-1/8". 


The Basic White Cardstock inside the card measures 4" x 5-1/4".  
Isn't the little mouse a fun touch? 


I hope you enjoyed today's card!  If you loved it so much you want to purchase any of the products, there is a product list at the bottom of this post. 😉  The Shimmer Paint, Playful Pets Designer Series Paper, and Balloon Bouquet Punch are retiring soon!  Don't miss your chance to add them to your stamping supplies.

Happy Stamping!  

PRODUCT LIST

Tuesday, March 30, 2021

March 2021 Paper Pumpkin Kit


This month's Paper Pumpkin kit is perfect for anyone who loves the outdoors, especially if they love the mountains!  This beautiful kit makes 4 each of two different cards, for a total of 8 cards with matching envelopes.  There was a free gift in this kit, in addition to all the stamps and normal supplies.  (The free gift was a Stamping Sponge and Stencils...I will share it next week)


Here's a tip for anyone who is like me and hates to waste ribbon/twine.  
Instead of wrapping the ribbon/twine around the cardstock three times, I cut three 4-1/2" pieces of twine.  Then, I used my Grid Paper to help line up the glue dots and attached the twine to the glue dots to the back of the cardstock.  Same look, but uses half the twine.  


In this kit, Stampin' Up! did not attach the liners to the inside of the envelopes, but included them so we can.  I absolutely love that they did it this way!  I often don't use the envelopes so I can cut them open to use the liners in my alternate cards.  Now I don't have to.  As you can see in the 1st picture included in this post, I chose to stamp the front of the envelope instead of using the liner.  Win-Win!

Three Things I Love About Paper Pumpkin
#1  I love getting a surprise in the mail every month!
#2  I don't have to spend time planning out a card!
#3  I can just grab my kit & a pair of scissors and I'm ready to create!


Don't miss out on the next Paper Pumpkin Kit!  For the first time, this kit was designed with kids in mind!  Do you have some special kiddos in your life who you like to craft with?  Subscribe to Paper Pumpkin by April 10th to take advantage of this cool kit!

Want to try Paper Pumpkin without subscribing?  Click one of the links below to try Paper Pumpkin for 1, 3, 6 or 12 months. 

Monday, March 29, 2021

Stampin' Up! Sailing Home Sunset Card

 
Hi!  Welcome to my blog.  :)  This card is stunning in real life!  These pictures just don't do it justice. 
I hesitated to take a picture using these Stampin' Classic Pads.  While we still have these colors, these exact pads have been retired for a while now.  (Stampin' Up! has new and improved ink pads now) I decided to go ahead and share with you so you know that Stampin' Up!'s products are great quality and will last a long time!

Now, this card.  It is only two layers. 
Layer 1 = Basic Gray Card Base
Layer 2 = Basic White Card Front

The first step to making this card is stamping the lighthouse in Basic Gray.  Next, use the lighthouse die from Smooth Sailing Dies to cut out a scrap piece of cardstock AND a sticky note.  You want to keep the cardstock outline and the sticky note lighthouse.  

SIDENOTE:  I like to use these full stick Post It notes for this 'masking' technique

Center the cardstock outline over your stamped lighthouse image.  Once you have it exactly where you want, put your sticky note lighthouse over your stamped lighthouse.  Now you can use Stampin' Up!'s Blending Brushes to add color, layer by layer, on your Basic White Card Front without worrying about getting ink over your lighthouse.  Blending Brushes are so fun to use and you really only need one!  Just make sure you start with the lightest color and brush off on a scrap piece of paper between colors.  Of course, you can also designate a Blending Brush for each color family (Reds, Yellows, Greens, etc) or even one for each color.  

For the inside, I used the small sailboat.  Stamp off once so  you get a slightly lighter image.  


I hope you are able to try Blending Brushes soon, if you haven't already!  They are super relaxing to use and the color combinations are endless!  

Happy Stamping! 

Are you in the USA?   I would love to be your Stampin' Up! Demonstrator, if you don't have one already!  You can Contact Me here, or with the link at the top of my blog.  

Don't have a catalog and want one?  Use the link on the right of my blog to download a PDF copy, or let me know you don't have a Stampin' Up! Demonstrator and would like a copy of the current catalog(s).  I will be happy to send you one! 

SUPPLY LIST

Saturday, March 27, 2021

Stampin' Up! Sweet Ice Cream Thank You Card


Hi!  Thanks for dropping by my blog on this sweet Saturday!  Are you an ice cream fan?  My husband and daughters LOVE ice cream!  Their favorites are vanilla, chocolate and cookies & cream. 


Today's card uses the amazing Ice Cream Corner Suite from Stampin' Up!  The only part of the suite I didn't use was the Blackberry Bliss Ribbon.  For this card, I just felt like the ribbon from the Playing With Patterns Ribbon Combo worked a bit better.  


I used the ice cream punch to punch the top of the ice cream out of a post it note. 
 (I like to use these Post-Its for this masking technique)  
After stamping the top layer of ice cream, I covered it with the post it, so I could stamp the next layer without stamping over the first layer.  I repeated the process with the next ice cream layer before stamping the cone. 
(I forgot to take a picture before putting the card together, but hopefully the above picture shows what I'm talking about)


The very last step was to attach the confetti sprinkles.  I gently spread Crystal Effects all over the top ice cream.  Then, while the Crystal Effects was still wet, I sprinkled the confetti over the top of the ice cream. This does take a while to dry, so I put it in a safe place and left it over night.  


MEASUREMENTS
Card Base ~ 8-1/5" 5-1/2"
DSP ~ 3-1/4" x 4-1/5"
Basic White ~ 2-1/4" x 3-1/2"
Bermuda Bay ~ 1-5/8" x 1-1/8"
Basic White ~ 1-1/2" x 1"
Inside Basic White ~ 5-1/4" x 4"
Ribbon ~ 8"


Did you like today's card?  Do you feel inspired to create something wonderful this weekend!?  
Happy Stamping! 

Have you seen the Paper Pumpkin announcement for April's Paper Pumpkin?  It ties in perfectly with the Sweet Ice Cream stamp set!  Even better, this kit was designed with kids in mind.  If you have kiddos you love to craft with, you don't want to miss this one!
Subscribe to Paper Pumpkin by April 10th to take advantage of this cool kit!

Are you in the USA?  Do you need a Stampin' Up! Demonstrator?  I will be forever grateful if you pick me!  Also, I will be happy to send you a new Stampin' Up! Catalog!  The PDF was just released to Demonstrators this week, and will be hitting mailboxes soon!  
Contact me HERE.  

PRODUCT LIST

Friday, March 26, 2021

Stampin' Up! Free As A Bird


Hi!  Happy FRIDAY!  Do you have wonderful weekend plans?  I hope so!  


This beautiful spring weather has me wanting to create with all the spring and summer themed stamped sets!  Isn't this Free as a Bird stamp set perfect for that!?  When I pulled it out to make a card, I just looked at it for a bit. I had no plan.  As I looked at it, I started thinking about how pretty just the birds on the branch are.  Then it hit me!  Why not just make a card with the birds and one of the perfect sentiments to go with it?  So, that's exactly what I did. 


I started by stamping the birds with their branch in (approximately) the middle of the Thick Basic White card base.  Then, the fun began.  I colored the image with blends.  The perfect color for the tree branch was achieved by layering Light Crumb Cake with Bronze.  After coloring the birds, I decided they needed to be softened a bit.  I achieved this by going over them with the Color Lifter.  Perfect!


For the inside of the card, I simply stamped the larger, solitary bird in the corner.  I contemplated coloring it in, but decided I liked the simple look of it.  In fact, I think just this bird would make cute stationary! 


I hope you like today's card.  I love that cardmaking can be as simple as Stamps, Ink and Paper.  
Create something wonderful this weekend! 
Happy Stamping! 

Are you in the USA?  Do you need a Stampin' Up! Demonstrator?  I will be forever grateful if you pick me!  Also, I will be happy to send you a new Stampin' Up! Catalog!  The PDF was just released to Demonstrators this week, and will be hitting mailboxes soon!  
Contact me HERE.  

PRODUCT LIST

Thursday, March 25, 2021

Stampin' Up! Snailed It Birthday Card


Hi!  Welcome to my blog!  If you had told me last December that I would be loving a stamp set with snails and mushrooms, I'm not sure I would have believed you.  I kept just glancing right over Stampin' Up!'s Snail Mail Suite, UNTIL I got January's Paper Pumpkin Kit.  That cute little snail won me over (my oldest daughter might have had a little something to do with it, too!)  Stampin' Up! really S-Nailed It with this suite!  


Not EVERY print in the Snail Mail Designer Series Paper is my favorite.  However, the DSP is double-sided, so even if I don't love one side, I just turn it over to the print I prefer!

I didn't have much of a plan when I started making this card.  The first thing I did was stamp the mushrooms in the bottom corner and colored them in with Stampin' Write Markers.  I thought about adding the snail somewhere, but wasn't liking how that was looking.  So, I decided to use the mushroom dies to cut out a few different mushrooms in different colors.  In the end, I only added one extra mushroom to my card.  I glued the Real Red and Blushing Bride mushroom pieces to a scrap piece of Basic White Cardstock, then fussy cut around it.  To attach it to the card front, I used 1-1/2 Mini Stampin' Dimensionals.  


To attach the ribbon, I cut it a little wider than my piece of cardstock, then used glue dots on the back to hold it in place.  After tying the bow, I attached it to the ribbon with another glu dot.  I often find this method of attaching ribbon and bows easier than tying it on. 
Also, isn't this ribbon awesome!?  I use it on a LOT of cards.  It's from the Playful Pets Suite. 


Remember that snail I said I wanted to put on the front but couldn't find a place for?  Here she is!  I decided she was perfect for the inside of the card!  I decorated the envelope flap with the same mushroom DSP used on the front of the card.


Happy Stamping!

PRODUCT LIST

Wednesday, March 24, 2021

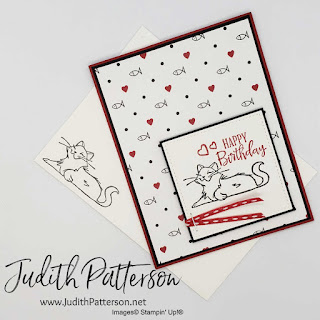
Stampin' Up! Pampered Pets Cat Birthday Card


Hi!  Welcome to my blog.  The card I shared yesterday used one of the dogs from the Pampered Pets stamp set.  Today's card features the same set, but one of the cats instead of the dog.  I made this card for a long time friend.  For decades now, we have given each other cards and other items that have both a cat and fish on them.  We started doing this because when we were in college, she always had fish, and I always had a cat!   

The layout for this special card was inspired by Challenge #209 at Fab Friday.  Check them out when you are in need of a little inspiration! 
I knew I was going for the cat and fish theme, so the first thing I did was cut my Playful Pets Designer Series Paper.  Then, I stamped the cat, using Memento Black Ink and the sentiment and hearts using Real Red.  I sprinkled a little Clear Emboss Powder over the images and sentiment, then heat embossed it.  I wasn't trying for anything super fancy, I just wanted to make sure it dried quickly so I didn't have to worry about smears.  


The ribbon was attached using a mini stapler I keep at my desk.  It isn't a Stampin' Up! stapler, or even a craft stapler.  It's just a simple little office stapler I have kept in my desk as long as I can remember.  Sure does come in handy when I'm being crafty though!


Isn't this perfect for the inside of the card!?  So cute, and a perfect finish!  
Of course I had to add the cat to the front of the envelope, too. 


What do you think of this stamp set and DSP?  I find myself using it a lot!

Happy Stamping! 

PRODUCT LIST

Tuesday, March 23, 2021

Stampin' Up! Pampered Pets


Happy National Puppy Day!  I had a card all ready to go for today's post, but then I realized it is National Puppy Day!  Of course I had to create a new card in honor of the day.  Thankfully, CAS Colours and Sketches posted a new sketch challenge today, perfect for using with the Playful Pets Suite!  


This is a quick card to put together.  It took less than 10 minutes once I gathered my supplies!  (For the supply list, scroll to the bottom of this post)
I recommend stamping the dog and sentiments first, so they have time to dry while you are cutting the Designer Series Paper strips.  These measure 3/4" x 5-1/2". 
The dog is colored in with Watercolor Pencils. (Basic Black, Basic Gray, and Real Red)
 

After tying the bow, I attached it with a glue dot.  The DSP was attached with Multipurpose Liquid Adhesive.  The dog and oval were attached with Stampin' Dimensionals. 


For the inside of the card I added another sentiment and paw prints in the corner.  
To add the prints, die cut the paw prints and use them as a stencil.  I used a Sponge Dauber to color in one paw, then moved my stencil and colored in a 2nd paw. 


I hope you enjoyed today's card!  Check back tomorrow for another card using the Pampered Pets Suite!  
Happy Stamping! 

Are you in the USA?   I would love to be your Stampin' Up! Demonstrator, if you don't have one already!  You can Contact Me here, or with the link at the top of my blog.  

Don't have a catalog and want one?  Use the link on the right of my blog to download a PDF copy, or let me know you don't have a Stampin' Up! Demonstrator and would like a copy of the current catalog(s).  I will be happy to send you one!

PRODUCT LIST

Monday, March 22, 2021

Stampin' Up! Timeless Tropical Birthday Card

Hi!  Welcome to my blog.  Take a minute to look around, hopefully you will find something to inspire to you!  I try to post a new card/project six days a week.
Have a question?  Please contact me here, I'll be glad to answer!

Today's card is this fun pineapple birthday card, featuring Stampin' Up!'s Timeless Tropical stamp set.  I realized last week that I don't make many masculine cards.  I have decided to be intentional about making at least one a week.  This one fits the bill.  It reminds me of one of my husband's tropical shirts!

If you look closely at the picture you can see that the pineapples were glued to the stitched rectangle pieces.  I had planned on adding at least the center pineapple with Stampin' Dimensionals.  However, I ended up adding so many layers of cardstock, I decided it didn't really need any more dimension.  The next time I make this card I will skip cutting each pineapple out and instead just use the Stitched Rectangle Die to cut around them.  

Each cardstock and Designer Series Paper layer was attached with Multipurpose Liquid Glue.  (You can also use Stampin' Seal, if that is your preferred adhesive)  I added the sentiment with Stampin' Dimensionals so it was raised just a bit above the top layer.  

The outer pineapples were colored with Light Blends.  The middle pineapple was colored using Dark Blends. 

The inside of the card was simply decorated with another pineapple in the corner.  This one was colored with the Light Blends, also.  I chose to also decorate the front of the envelope with this cute pineapple.  I would have added the matching DSP to the envelope flap, but this was my last big piece of this color/design!  


I hope you enjoyed today's card and have time to create something wonderful soon!
Happy Stamping!  

Are you in the USA?   I would love to be your Stampin' Up! Demonstrator, if you don't have one already!  You can Contact Me here, or with the link at the top of my blog.  

Don't have a catalog and want one?  Use the link on the right of my blog to download a PDF copy, or let me know you don't have a Stampin' Up! Demonstrator and would like a copy of the current catalog(s).  I will be happy to send you one! 

Saturday, March 20, 2021

Dragonfly Garden Card for a Friend - Casually Crafting Blog Hop


Hi!  Welcome to my blog!  I'm so excited to be part of the Casually Crafting Design Team.  We are an international group of Independent Stampin' Up! Demonstrators who want to share our take on casual crafting.  We will share what we love with you monthly.  Be sure to check out the rests of the design team's projects using the links at the bottom of this post. 


Today I'm sharing TWO cards.  The first is a perfect card for the beginner stamper.  The second is just a slightly stepped up version of this first one.  You can find a full list of products used at the very end of this post. 


MEASUREMENTS (for both cards)

Card Base ~ 8-1/2"x11-1/2", score at 4-1/4"
DSP Card Front ~ 4"x5-1/4"
Basic White ~ 3"x4-1/4"
Inside Basic White ~ 4"x5-1/4"
Inside DSP Strip* ~ 1/2"x5-1/4"
Optional DSP* for envelope flap ~ 2-1/4"x6"

INSTRUCTIONS
  1. Cut cardstock according to above measurements
  2. Stamp the dragonfly on a scrap piece of Basic White cardstock
  3. Stamp the flowers on the 3x4-1/4" piece of Basic White
  4. Color in the wings of the dragonfly, then punch out with the Dragonfly Punch
  5. Attach the dragonfly to the Basic White Cardstock, next to the flowers
  6. Stamp the sentiment under the dragonfly
  7. Attach DSP Card Front to Card Base.  Then, the stamped Basic White piece to the Card Front.

For the Stepped Up Version:
    • Follow Steps 1-4 above, PLUS...
    • After coloring the dragonfly, also color a few of the flowers
    • Using Versamark, stamp the dragonfly on Vellum.  Sprinkle with Clear Emboss Powder then melt with the Heat Tool.  Punch out
    • Attach the center of the vellum dragonfly to the top of the other dragonfly with Multipurpose Liquid Glue.  I used a piece of a Stampin' Sponge to smear the glue so it was clear when it dried. 
    • Stamp the sentiment, then Heat Emboss with Clear Emboss Powder.  
    • Attach the cardstock layers with the adhesive of your choice.  Attach the dragonfly using Mini Stampin' Dimensionals
    • Using a glue dot, attach the ladybug trinket to the flowers


    • Attach the strip of DSP to the inside piece of Basic White, either along the top or the bottom
    • Attach the Basic White CS to the inside of the card
    • OPTIONAL: attach the DSP to the envelope flap, then trim around it


Thank you for stopping by my blog.  I hope you enjoy this card and are inspired to create something wonderful!  Don't forget to swing by the other Casual Crafters Blogs (using the links below) to see what they have been up to. 
Happy Stamping! 
Product List